Quilling: The Delicate Art of Paper-Rolling Through the Ages
What you'll learn
 History of QuillingEssential Quilling ToolsBasic Quilling TechniquesQuilling Community and Resources
The Enduring Art of Quilling: A Historical Overview
The origins of quilling can be traced to 15th-century Europe, where nuns would use gilded paper strips, often salvaged from the trimmed edges of religious texts, to decorate religious objects. They would roll the paper around a feather quill – hence the name 'quilling' – to create delicate filigree designs that appeared remarkably similar to costly gold or silver work. This clever use of materials provided an affordable yet beautiful way to adorn reliquaries and holy pictures.
By the 18th century, quilling had found its way into secular society, becoming a popular pastime among European gentlewomen. It was particularly favored in England, where ladies of leisure used it to decorate tea caddies, screens, furniture, and even picture frames. The designs often emulated the highly prized and expensive wrought iron or carved ivory popular during the Baroque and Rococo periods. Quilling boxes, complete with their tiny tools and paper strips, were common features in many well-appointed homes.
Though its popularity waned in the 19th and early 20th centuries, experiencing periods of neglect, quilling has enjoyed a significant resurgence in modern times. Driven by a renewed interest in handmade crafts and the accessibility of information through online communities, quilling has evolved from a niche historical craft into a vibrant contemporary art form. Artists today push the boundaries of paper art, creating everything from intricate jewelry to large-scale sculptural pieces.
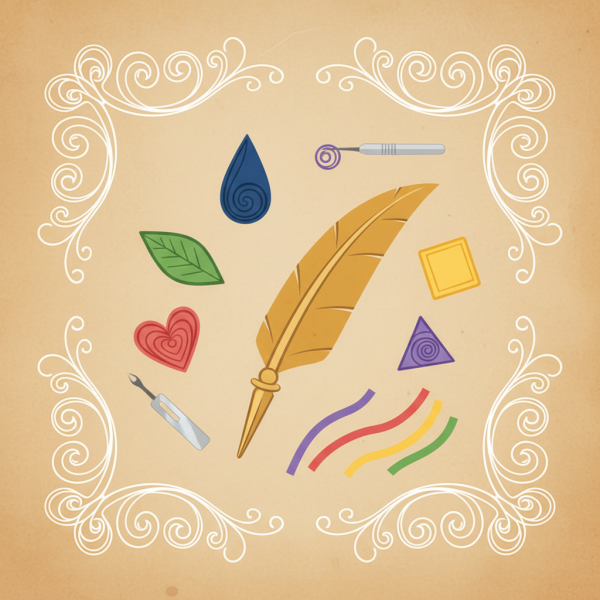
Essential Tools for the Modern Quill Artist
Embarking on your quilling journey requires only a few fundamental tools, most of which are inexpensive and readily available. The beauty of quilling lies in its simplicity and accessibility.
- Quilling Paper: This is specialized paper cut into narrow strips of uniform width. It comes in a vast array of colors and widths, typically ranging from 1/16 inch to 1/2 inch.
- Slotted Quilling Tool: The most common tool for beginners. It has a small slit at the end to insert the paper strip, making it easy to roll tight, consistent coils.
- Needle Tool: An alternative to the slotted tool, it has a fine needle at the tip. This tool allows for a perfectly centered, looser coil, as the paper isn't held in a slot.
- Tweezers: Essential for handling delicate paper coils, applying glue, and positioning your shaped pieces precisely.
- White PVA Glue: A fast-drying, clear-drying glue is perfect for securing the end of your coils and attaching finished shapes.
- Circle Sizer Ruler/Template: A useful tool with various sized holes that helps create uniform coils. You roll a tight coil, place it into a hole, and allow it to relax to a consistent size.
- Scissors: For cutting paper strips or trimming ends.
Fundamental Techniques: Rolling and Shaping
The core of quilling involves just a few basic actions that, when mastered, unlock endless creative possibilities. It all begins with rolling a 'coil' and then shaping it.
To create a basic closed coil, you insert one end of a paper strip into the slot of your quilling tool (or wrap it around a needle tool). Begin to roll the paper tightly and evenly around the tool, keeping the edges aligned. Once the entire strip is rolled, carefully slide it off the tool. For an 'open coil,' you then let the coil expand slightly, often within a circle sizer, before gluing the end. A 'tight coil' is simply glued without allowing it to expand.
Once you have a basic open coil, you can start shaping it by gently pinching and manipulating the paper. Here are some foundational shapes:
- Teardrop: Pinch one side of the open coil into a point, leaving the other side rounded.
- Marquise (Eye Shape): Pinch both ends of the open coil into points.
- Square: Pinch four equidistant points on the coil, then flatten the sides.
- Triangle: Pinch three equidistant points on the coil.
- Leaf: A variation of the marquise, where one point is pinched slightly more elongated or curved.
- Heart: Create two teardrops, then glue their pointed ends together and gently indent the rounded tops.
Combining these simple shapes allows for the creation of incredibly intricate patterns and designs, from floral motifs to geometric tessellations.
Beyond the Basics: Advanced Designs and Applications
As you gain confidence with the fundamental shapes, the world of advanced quilling opens up. This can involve combining multiple shapes into complex patterns, working with different paper widths and colors to create depth and texture, or even venturing into three-dimensional forms.
Advanced techniques include fringing, where paper strips are finely cut along one edge before rolling to create fluffy, textural elements for flowers or animal fur. Husking is another method, involving wrapping paper strips around pins to create intricate lace-like designs. Sculptural quilling pushes the boundaries, allowing artists to create free-standing figures, elaborate jewelry, and even decorative bowls by shaping and stacking quilled elements.
Quilling finds diverse applications today. It's popular for embellishing greeting cards, scrapbooks, and gift tags. It's also used to create unique earrings, pendants, and other jewelry pieces. Larger quilled artworks can adorn walls, or even be integrated into mixed-media installations, demonstrating the versatility and enduring appeal of this ancient craft.
Joining the Quilling Community
One of the most rewarding aspects of learning any art form today is the ability to connect with a global community of fellow enthusiasts. Online learning platforms, social media groups, and dedicated forums are brimming with quillers eager to share tips, showcase their work, and offer encouragement.
Whether you're looking for inspiration, tutorials, or simply a place to ask questions, these communities provide invaluable resources. Many experienced quillers offer online workshops, downloadable patterns, and even kits to help beginners get started. Engaging with the community can accelerate your learning, introduce you to new techniques, and provide a supportive environment for your artistic growth.
Summary
Quilling, or paper-rolling, is an ancient art form that has beautifully transitioned into the modern era. From its monastic origins in the Renaissance, mimicking precious metals and ivory, it has evolved into a versatile craft enjoyed by artists worldwide. We explored the essential tools needed for starting your quilling journey, from specialized paper to slotted tools and precision glue. The fundamental techniques of rolling and shaping basic coils into myriad forms were discussed, alongside a glimpse into more advanced applications like fringing and sculptural quilling. Finally, the immense value of connecting with the vibrant online quilling community for learning and inspiration was highlighted, inviting all to discover the delicate beauty of paper artistry.
Comprehension questions
 What historical periods saw a significant rise in quilling's popularity, and why was it practiced?Name three essential tools for a beginner quiller and briefly describe their function.How is a basic open coil created in quilling, and what are two fundamental shapes that can be derived from it?Beyond basic shaping, what are some advanced quilling techniques and modern applications mentioned in the article?